Why pong?
The idea of this series is to go along with the evolution of games, so we’re starting from the beginning with pong. Each week I’m going to release a blog tutorial on how to create a game newer than the last, eventually, the blog in approximately 50 weeks time will be “How to code Fortnite! (2017) -51″, or not. Note, if you’re unfamiliar with p5.js and its syntax, check out my previous blog!
If you google “First game created” likely Pong will pop up, It’s not officially the first game to be created, but it is the first commercially successful. It was created in June 1972!
Setup
Open up the web editor!
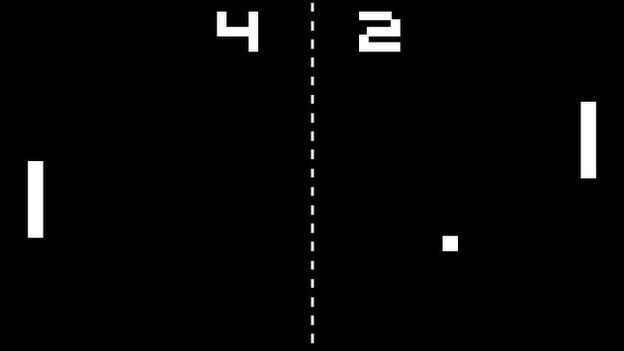
Just from looking at the dimensions of the image above it has a height of 351 and width of 624 and a black background, let’s copy this!
function setup() {
  createCanvas(624, 351);
}

function draw() {
  background(0);
}
Paddles
For the paddles, we’re going to create a new Paddle class, right-click the project folder | Add file | Call it Paddle.js

Then reference this file in the index.html, so we can access it in our sketch:
Index.html
<html>
  <head>
    <script src="https://cdnjs.cloudflare.com/ajax/libs/p5.js/0.7.2/p5.min.js"></script>
    <script src="https://cdnjs.cloudflare.com/ajax/libs/p5.js/0.7.2/addons/p5.dom.min.js"></script>
    <script src="https://cdnjs.cloudflare.com/ajax/libs/p5.js/0.7.2/addons/p5.sound.min.js"></script>
    <link rel="stylesheet" type="text/css" href="style.css">
    <meta charset="utf-8" />

  </head>
  <body>
    <script src="sketch.js"></script>
    <script src="Paddle.js"></script> <!-- add this! -->
  </body>
</html>
Paddle.js
So our paddle class only takes a number in its constructor, this number is going to represent the x position of the paddle. We only need to specify the x position because when creating the two paddles that’s the only thing between the two that is going to differ. If you’re unfamiliar with classes and constructors I recommend briefly glossing over this to get up to speed!
class Paddle {
	constructor(x) {
		this.x = x;
		this.y = height / 2; // height is height of display window
		this.height = 80;
		this.width = 20;
	}


	display() {
		fill(255);
		rect(this.x, this.y, this.width, this.height);
	}

}
Notice we’ve also created this function called display(), this is going to be called so that our paddles show on our canvas!
sketch.js
Let’s jump back to sketch.js and create our paddle object, in setup() and then call our display() on that paddle in the draw, this means that the display() function is called 60 times a second!
let playerPaddle;

function setup() {
  createCanvas(624, 351);
  playerPaddle = new Paddle(26);
}

function draw() {
  background(0);
  playerPaddle.display();
}
You should have something that looks like this, bloody gorgeous.

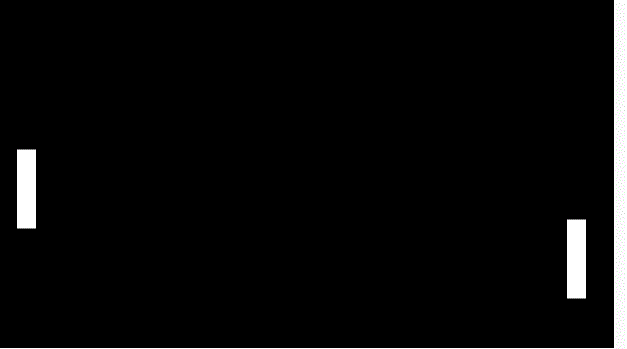
Let’s quickly add the other one! I’ve called it aiPaddle as we’re gonna add some very basic artificial intelligence to it!
let playerPaddle;
let aiPaddle;

function setup() {
  createCanvas(624, 351);
  playerPaddle = new Paddle(26);
  aiPaddle = new Paddle(width - 48);
}

function draw() {
  background(0);
  playerPaddle.display();
  aiPaddle.display();
}
Look at that, brilliant.

Making the paddles move
The paddles only need to go one of two directions, up or down. So let’s create a function in the paddle class called up() and down().
class Paddle {

	constructor(x) {
		this.x = x;
		this.y = height / 2;
		this.height = 80;
		this.width = 20;
	}


	display() {
		fill(255);
		rect(this.x, this.y, 20, 80);
	}

	// add these little buggers
	up() {
		this.y -= 2;
	}

	down() {
		this.y += 2;
	}

}
Let’s test this out by making the playerPaddle go up by calling it in the draw function of sketch.js.
function draw() {
  background(0);
  playerPaddle.display();
  aiPaddle.display();

  // make that paddle fly!!!
  playerPaddle.up();
}
Key presses
Ideally, if we want to actually be able to play the game we’d like to control the paddle ourselves.
The first thing we need to do is add a couple flags to the Paddle class to track whether a paddle is currently moving up or moving down, these are going to be boolean values, isUp and isDown which will be either true or false.
class Paddle {
	constructor(x) {
		this.x = x;
		this.y = height / 2;
		this.height = 80;
		this.width = 20;

		this.isUp = false;
		this.isDown = false;
	}
Then we can use some p5.js built-in functions for keypresses! keyPressed and keyReleased. So when we click the up arrow we set the isUp flag in the Paddle class to true and set the isDown flag to false, to stop it going down if it currently is. And then when we let go of the arrow (keyReleased) we set the flags to false. Note, this code is in sketch.js, just below the draw() function.
function keyPressed() {
	if (keyCode == UP_ARROW) {
		playerPaddle.isUp = true;
	} else if (keyCode == DOWN_ARROW) {
		playerPaddle.isDown = true;
	}
}

function keyReleased() {
	if (keyCode == UP_ARROW) {
		playerPaddle.isUp = false;
	} else if (keyCode == DOWN_ARROW) {
		playerPaddle.isDown = false;
	}
}
Then we actually need to call the up() and down() functions according to the flags, I’ve plonked this in the draw() function.
function draw() {
  background(0);

  playerPaddle.display();
  aiPaddle.display();

  // make the player move according to the flag
  if (playerPaddle.isUp) {
    playerPaddle.up();
  } else if (playerPaddle.isDown) {
    playerPaddle.down();
  }

}
Then if we run the program and click some buttons!

ahhhh, notice there’s a problem it can go off the screen, bugger, better cater for that.
Also, don’t worry we will get round to moving the other paddle, but that’s going to need to know the position of the ball first!
Keeping the paddles in the game
So yeah, we need to stop the paddle from being able to move off the screen. How on earth do we do that? Well, let’s add some logic to the up() and down() functions.
up() {
		if (this.y > 0) {
			this.y -= 2;
		}
	}

	down() {
		if (this.y < height - this.height) {
			this.y += 2;
		}
	}
The x and y location of the rectangle represents the top left corner point. So we take away the height of the paddle in order to constrain the whole paddle!


Adding the ball!
This part is going to be very similar to my introduction to p5.js blog as I added a ball which bounced off the walls! I won’t go into as much detail here to try not to repeat myself too much.
- Add a new file call it Ball.js
- Add the file in the index.html the same as what we did earlier
The ball is spawned in the center of the screen, and given a random direction from -3 to 3 this is defined by xSpeed and ySpeed, these values get added to the x and y each frame within the update function!
class Ball{
constructor() {
this.r = 10;
this.reset();
}
update() {
// if it hits the top or bottom change direction
if (this.y < this.r || this.y > height - this.r) {
this.ySpeed = -this.ySpeed;
}
// if it goes to the end of the sreen restart the game
if (this.x < this.r || this.x > width + this.r) {
this.reset();
}
this.x += this.xSpeed;
this.y += this.ySpeed;
}
reset() {
this.x = width/2;
this.y = height/2;
this.xSpeed = random(3, 4);
// determines if it's going left or right
let isLeft = random(1) > .5;
if (isLeft) {
this.xSpeed = -this.xSpeed;
}
this.ySpeed = random(-3, 3);
}
display() {
ellipse(this.x, this.y, this.r * 2, this.r * 2);
}
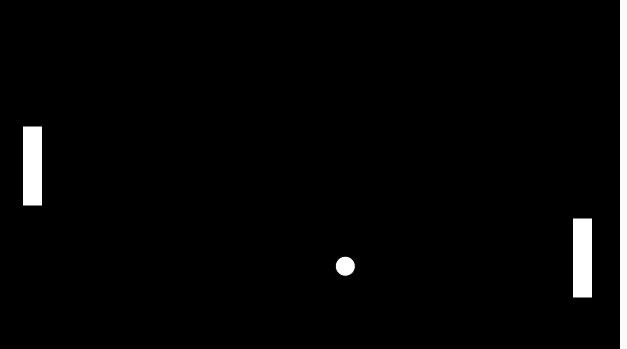
}Now we just need to create the object in the sketch.js and call the ball objects update() and display() functions in sketches draw! (I’ve put some comments at the end of each line of code I’ve added to make it easier to see the changes)
let playerPaddle;
let aiPaddle;
let ball; // define the ball

function setup() {
    createCanvas(624, 351);
	playerPaddle = new Paddle(26);
	aiPaddle = new Paddle(width - 48);
	ball = new Ball(); // create the ball object
}

function draw() {
  background(0);

	playerPaddle.display();
	aiPaddle.display();

	if (playerPaddle.isUp) {
		playerPaddle.up();
	} else if (playerPaddle.isDown) {
		playerPaddle.down();
	}

	ball.update(); // call the update function within ball
	ball.display(); // call the display function within ball

}
Woooooooooooooooo!! we’re getting there!

Making the artificial intelligence!!
This is going to be a riveting chapter, watch out google deepmind! Let’s add some artificial intelligence.
The first thing we need to do is pull this code out of the sketch.js file, as we want to make use of it with both players, so let’s plonk it into the paddle class.
    if (playerPaddle.isUp) {
		playerPaddle.up();
	} else if (playerPaddle.isDown) {
		playerPaddle.down();
	}
So we have a new function now in the paddle class called update() this will be called in sketch.js.
update() {
  if (this.isUp) {
    this.up();
  } else if (this.isDown) {
    this.down();
  }
}
THE AI!
If you were going to create some AI for the paddle what would you do? Well, here’s my thought process. If I’m the paddle, if the ball is above me, go up, if the ball is below me, go down. So that’s what I’ve coded.
Meet my beautiful function processAI(). It gets the middle of the paddle and determines whether the ball is above or below!
function draw() {
  background(0);

  playerPaddle.display();
  aiPaddle.display();

  playerPaddle.update(); // add this
  aiPaddle.update();     // and this

  processAI();   // andddd thiss

  ball.update();
  ball.display();

}

function processAI() {
  let middleOfPaddle = aiPaddle.y + aiPaddle.height / 2;

  if (middleOfPaddle > ball.y) {
    aiPaddle.isUp = true;
    aiPaddle.isDown = false;
  } else {
    aiPaddle.isDown = true;
    aiPaddle.isUp = false;

  }
}
She’s a little bit jittery, but it’ll do for now 😀
Hitting the ball!
Now we actually need the ball to bounce off the paddle, so we can get a game going!
To do this we need to think about how the paddles differ, the main difference is that they are in different x locations, which means the same hit detection isn’t going to work for both.
We need 3 separate functions for this, that I’ve plonked into the ball class. hasHitPlayer() which checks to see whether the ball has hit the player using the player’s coordinates, as we pass in the player object! hasHitAi() is the same but with the different x location, then, isSameHeight() can be used by both hasHitPlayer() and hasHitAi().
hasHitPlayer(player) {
  if (this.x - this.r <= player.x + player.width && this.x > player.x) {
    if (this.isSameHeight(player)) {
      this.xSpeed = -this.xSpeed;
    }
  }
}

hasHitAi(ai) {
  if (this.x + this.r >= ai.x && this.x <= ai.x + ai.width) {
    if (this.isSameHeight(ai)) {
      this.xSpeed = -this.xSpeed;
    }
  }
}

isSameHeight(player) {
  return this.y >= player.y && this.y <= player.y + player.height
}
And now we have a game we can actually play!!!
Halfway line!
Not really important, but why not, let’s add a halfway line. This is only 2 lines of code so relax!
In sketch.js
function draw() {
  background(0);

  playerPaddle.display();
  aiPaddle.display();

  playerPaddle.update();
  aiPaddle.update();
  processAI();

  ball.update();
  ball.display();

  ball.hasHitPlayer(playerPaddle);
  ball.hasHitAi(aiPaddle);

  stroke(255); // gives a white stroke
  line(width/2, 0, width/2, height); // draws a line between two points line(x,y,x1,y1)

}
Finally, let’s add some scores!
It’s not a game without a scoring system. Okay, so what we’re aiming for is something like this:

Challenge
You’ve gotten this far in the blog, so congratulations! I challenge you to implement the scoring system, remember how we’ve added new classes, created the objects, called functions on them objects. Think about how you could structure this. I strongly believe that the best way to learn is by doing, so get your hands dirty and struggle on some code.
If you get really stuck then you can go check out how I’ve done it for reference on my github for this series. I encourage you to go and see how I’ve done it even if you’ve already implemented it yourself, it is always good to see how other programmers solve problems, it’ll give you a whole new perspective. I can almost guarantee I’ve done it different to you, that’s the beauty of programming!!
[…] year on from pong came Space Race (also made by Atari). Space Race is very simple, it’s a two player game, each […]
[…] in this blog on my website codeheir.com where I go through the evolution of games, so starting with Pong – 1972 then Space Race – 1973, etc. It’s basically a step by step process of how to code the […]
Bro it’s so useful but I have doubt in creating a game and saving it
Which app is good for coding in Android and PC
I’d recommend Android Studio by Jetbrains!
Thank you everybody asks money for it
It is very useful.
108 has an error i cant fix
What’s the error?
[…] in 1976 which is a game I contemplated coding for my blog two weeks ago but I thought it was too similar to pong to bring any new concepts that haven’t already been covered in the series; I did Blockade […]
[…] in this blog on my website codeheir.com where I go through the evolution of games, so starting with Pong – 1972 then Space Race – 1973, etc. It’s basically a step by step process of how to code the […]
There’s something i don’t understand. when hitting the ball, how do you determine whether it goes up or down?
The ball just moves in the opposite direction, so if it hits the top notice we negate the `ySpeed`. It might be worth playing around with this.
for instance if you hit the ball on the bottom of the bat, make it go down, and if you hit it on the top of the bat, make it go up.
[…] en mi sitio web codeheir.com donde paso por la evolución de los juegos, así que comenzando con Pong – 1972 luego Carrera espacial – 1973, etc. Es básicamente un proceso paso a paso de cómo codificar […]
[…] created it using the tutorial on Codeheir.com which is very easy to follow and does a good job of explaining what each bit of code does and why […]
[…] Pong using JavaScript […]
You’ve managed to interest me.
[…] of my most successful blogs How to code Pong will be a good place to start. I’ll grab the code from my GitHub repository and get […]
Hello there !
thank you for your help but i have a problem in the last step.
i just want the ball to bounce of the paddle.. i did exactly what you did but it didn’t work for me.
the ball doesnt return when it touch the paddle.
please help me bro i have a project to present in about 07 hours from now.
leave me your response abut where should i put this code :
hasHitPlayer(player) {
if (this.x – this.r player.x) {
if (this.isSameHeight(player)) {
this.xSpeed = -this.xSpeed;
}
}
}
hasHitAi(ai) {
if (this.x + this.r >= ai.x && this.x = player.y && this.y <= player.y + player.height
}
Hello mate, you need to put this code in ball.js.
take a look at https://github.com/LukeGarrigan/codeheir.com/tree/master/evolution-of-games/1%20-%20pong you’ll be able to see the code exactly as it is.
the tutorial is missing 2 lines of code, which you can see in the Halfway line picture
ball.hasHitPlayer(playerPaddle);
ball.hasHitAi(aiPaddle);
once you add those it will work
it tells me that ball is not defined or is not a constructer