Introduction
So you want to get into programming? And you know you want to code games, then hopefully, this is the perfect blog for you. In this blog I’ll be going through the very fundamentals of programming. To do this we’ll be using p5.js, you’ve probably heard of JavaScript (JS), well, p5.js is just a JavaScript library — an extension of the language — that has a tonne of drawing functionality that we can use to develop 2D games.
What we will create
We are going to create our very own cookie clicker!

Getting started
The first thing you need to do is open up the p5js editor, this is where we will be writing our code, the editor is great because once you’ve finished your game you can send a link to your friends and allow them to play it too!
You should see the following:
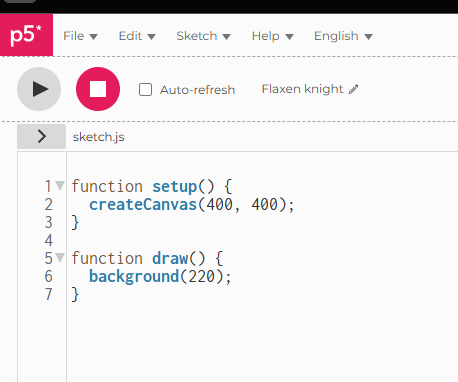
you’ll notice the play button, go ahead and click that – this will run your code:

You should see the above in the preview section on the right, this is the output of the already existing code.
setup() and draw() functions
The existing code has two functions setup() and draw(). A function is just a block of code that performs a specific task, anything between curly braces { } is a block of code. So the setup() and draw() functions both have their own tasks. The concept for these two functions is very simple.
setup()
The setup() function gets called once at the start of your program, so as soon as you hit the play button, the setup() function will execute.
draw()
The draw() function gets called continuously until your program stops executing, so whatever is within the draw() function gets executed and executed, time after time. This happens 60 times per second, overwise known as your framerate which is a term all of you gamers will be familiar with!
What is createCanvas(400, 400) and background(220)?
createCanvas
This creates a canvas element with the width and height of 400px. Basically, the canvas element is what we’re drawing on! Remember how draw() and setup() are functions, well here we’re calling a function called createCanvas. So our setup() function calls another function called createCanvas, remember this will only ever happen once because setup() only gets called once. Notice how the createCanvas(400, 400) function takes in two numbers, these are called function arguments which means we can pass in some information to the function to make it behave a certain way, in our scenario we are passing in the width and the height.
Go ahead and change the numbers that we pass in to the createCanvas function, write createCanvas(600, 600) and hit play, notice how the canvas got bigger on the right?

background
The background function colours in the canvas, If you specify just one value as an argument like background(220) it is grayscale, but you can choose any colour you wish using RGB arguments. background(251, 211, 219) will give you a lovely pink. Each value is in the range of 0 to 255. More information can be found here.
Change your background function call to the following:
background(251, 211, 219)
And hit play:

Creating our cookie
Cookies are usually round in shape so let’s add a circle. Luckily p5.js has a circle function that we can call. The function definition looks like this circle(x, y, diameter) So you provide these numbers when you call the function.
The very top left of the canvas is the coordinate (x, y) = (0, 0) and the very bottom right is (600, 600), hopefully the image below will help you to visualise it:

So if we wanted to put something in the dead centre of the canvas what would the coordinates be? That’s right x = 300 and y = 300. So, let’s write the code to call the circle function within our draw() function underneath the background code.
circle(300, 300, 300)
So the first two 300s represent the x and the y, play around with the numbers to watch it change, the 3rd 300 is the diameter, the size of the circle.

This is what your code should look like so far:
function setup() {
  createCanvas(600, 600)
}
function draw() {
  background(251, 211, 219)
  circle(300, 300, 300)
}
Notice how the circle function call is after the background function call. This is because we want the circle to be on top of the background. Much like when you’re doing a painting, if you were painting a bird in the sky, you’d paint the sky first and then the bird on top of the sky not the bird first and then the sky on top of the bird, then you’d just have a sky!
Adding a score
When somebody clicks on our cookie/circle we want some score to display and increment on click. Let’s first add the score.
Variables
So you’ve probably heard the term variable, but what actually is it? A variable just allows us to store some information so that we can use it in our program. So for us, we want to store the score so we can display it. In JavaScript you can define a variable a couple ways but in this tutorial we’re going to use var. Here are some examples of stuff you might want to store in your program and how defining the variable would look:
var salary = 1000000
var age = 11
var hungry = true
var name = "codeheir"
The word after var is the variable name you choose, it’s good practice to call your variable names in camelCase so if you had a really long variable name, it would look like this:
aReallyLongVariableName
Where you lower case the first letter of the first word and then upper case the first letter of the subsequent words. More information on variables can be found here but it won’t be necessary for our cookie clicker!
So let’s add our score variable, of course, we want to start the score off at 0. Remember, if this was within the draw() function the variable would get set every time the function is called which would mean that our score would get set back to 0 each time, we don’t want that. So let’s add var score = 0 to the very top of the file
var score = 0
function setup() {
  createCanvas(600, 600)
}

function draw() {
  background(251, 211, 219)
  circle(300, 300, 300)
}
If you hit play, the output of the program will be the same because although we’ve set our first variable we’re not actually using it!
To display our score we’re going to use the <a href="https://p5js.org/reference/#/p5/text">text</a> function. The text(word, x, y) takes the word as the first function argument, the x as the second and the y as the third. Let’s put our score in as the word that we want to display and then the x and y locations. Add the following code in your draw function:
text(score, 300, 100)

You should see the score has been added to the canvas! Congratulations, you’ve just created and used a variable.
It’s probably a little too small, so let’s change the size of the text using <a href="https://p5js.org/reference/#/p5/textSize">textSize</a>, this function takes one argument which is the size of the text- textSize(theSize).
Let’s add the following to our program:
textSize(60)
Which should look something like:

That’s a better size, but it’s a little off center, let’s make use of the textAlign function and pass it in CENTER as an argument. Add the following to the code in the draw function:
textAlign(CENTER)
So that your overall code looks like this:
var score = 0
function setup() {
  createCanvas(600, 600)
}

function draw() {
  background(251, 211, 219)
  circle(300, 300, 300)

  text(score, 300, 100)
  textAlign(CENTER)
  textSize(60)
}
Which should, when played look like:

Now we’re getting somewhere!
Clicking the cookie
When we click on the cookie we want our score to increase by 1. In order to do this we need to add a function to our code called mouseClicked(). So whenever somebody clicks using their mouse this function will execute:
add the following code underneath the draw function.
function mouseClicked() {
    console.log('I just got clicked')
}
Notice if you play and then click anywhere you’ll see in your console, “I just got clicked” – one for every time you click. console.log is a way for us to debug our program or just sanity check that a function is getting executed like we’ve just done. I added the console.log('I just got clicked') just to make sure that when we click with the mouse that function gets executed.
Incrementing the count
So when we click we want our score to increase by 1. So let’s add the following code to the mouseClicked function:
score = score + 1
What this is doing is increasing the value of our variable by 1, we’re assigning it to itself plus 1. This can also be written in shorthand like score++.
var score = 0;
function setup() {
  createCanvas(600, 600)
}

function draw() {
  background(251, 211, 219)
  circle(300, 300, 300)

  text(score, 300, 100)
  textAlign(CENTER)
  textSize(60)
}

function mouseClicked() {
  score = score + 1
}
So now when you click the score should increase:

Awesome! However, there’s a slight problem with this approach, well done if you spotted it! The score increments regardless of whether you click the cookie or not, we want to restrict increasing the score to just when we click the cookie.
To do this we’re going to require a little bit of maths!
We will be using the dist(x, y, x1, x2) function which calculates the distance between two points. The two points we will be using is the center of the circle and the position the person clicks. If the distance between the two points is less than or equal to the radius of the circle then they have clicked within the circle, hopefully the following image explains that a little better:

Let’s add this code, so that our mouseClicked function looks like:
function mouseClicked() {
  var distance = dist(300, 300, mouseX, mouseY)
  if (distance <= 150) {
    score++
  }
}
Now, there’s a couple things to unpack here. The first line we are calling the dist function which is returning us the distance between two points. The first two arguments of the dist function are 300 and 300 which is the x and y of the centre of our circle, the second coordinates is mouseX and mouseY which are special p5.js variables that track the position of the mouse. So we retrieve the distance between those two points as shown in the diagram and then we set it to a new variable called distance, so we can then use it in an if statement.
If statements
An if statement allows us to perform different actions based on different conditions. They follow this structure:
if (condition) {
  //  block of code to be executed if the condition is true
}
So in our example we have if (distance <= 150) so this is saying if the distance is less than or equal to the radius of our circle (circle has a diameter of 300, radius is just half the diameter) then execute the code score++ so it’ll increase our score. If the condition is not satisified, i.e the person clicks next to the cookie but not within, then the score doesn’t get increased.
Try it out for yourself!

Making it bounce
When we click it, we want some kind of indication that the cookie is being clicked, so let’s make it bounce.
So rather than hardcoding 300 as the diameter of the circle, let’s create a new variable that we can reference whenever we want. At the top of the code where you’ve written the score variable let’s add var diameter = 300 and update the call to the circle(x, y, diameter) function so that it takes our diameter variable as an argument rather than the hardcoded 300. So the code should now look like this:
var score = 0
var diameter = 300
function setup() {
  createCanvas(600, 600)
}

function draw() {
  background(251, 211, 219)
  circle(300, 300, diameter)

  text(score, 300, 100)
  textAlign(CENTER)
  textSize(60)
}

function mouseClicked() {
  var distance = dist(300, 300, mouseX, mouseY)
  if (distance <= 150) {
    score++
  }
}
If you run the program, once again there shouldn’t be any difference in functionality as all we’re doing is setting a variable for a value we’d hardcoded before.
Next, when we click we want the diameter of the variable to decrease to 280 and then we will perform some magic to make it pop back to real size.
Add diameter = 280 within our mouseClicked function:
function mouseClicked() {
  var distance = dist(300, 300, mouseX, mouseY)
  if (distance <= 150) {
    score++;
    diameter = 280
  }
}
So you’ll notice that when you hit play and then click the cookie it’ll decrease in size, but it’ll stay that size as that’s what we’ve set it to!
To make it pop back to the starting size add the following code within our draw function
diameter = lerp(diameter, 300, 0.1)
The lerp function linearly interpolates the number to another number – so our diameter of 280 changes gradually back to 300. Don’t worry about the ins and outs of this function it just gives our cookie a nice bouncing effect!

Adding an actual cookie
Clicking a circle is boring, let’s add an actual cookie
Right-click and save this image, we’re going to add it to our game! Credit goes to https://dribbble.com/shots/5358537-Cookie for the image

You will have to have an account with https://editor.p5js.org/ to be able to upload images, I suggest signing up so all your code can be saved! (it’s free)
In the editor, click the side panel:

Then using the drop-down “Upload file”:

You should see the cookie.png in your files list:

Let’s load our image, first let’s create a any empty cookieImage variable at the top of our file:
var cookieImage
It’s not been set to anything to start with, we’re going to load our image which will then set the variable. So in our setup() function add the following:
cookieImage = loadImage('cookie.png')
The loadImage(pathToImage) function does exactly what you’d imagine, it loads the image into memory so we can use it. The top of our code should look like the following:
var score = 0
var diameter = 300
var cookieImage
function setup() {
  createCanvas(600, 600)
  cookieImage = loadImage('cookie.png')
}
// .. rest of code
Next we need to replace the circle with the cookie, let’s comment out our circle code
Comments
Comments in code is a way for us to explain what the code is doing, a comment can start with two slashes.
// this is a commentYou may have already noticed a comment earlier when explaining about if statements. A comment doesn’t get executed, it has no effect on the program. So you may add comments to help you understand code or to help others understand the code you’ve written!
In our case, we’re going to comment out the code for the circle so that it doesn’t get executed any more, or, you could always just delete the code!
If you comment out the circle(300, 300, diameter) code so that it looks like // circle(300, 300, diameter) then when you execute the program it should look like:

Brilliant, now let’s add our cookie using the image function – image(img, x, y, width, height). So it takes the image as the first argument, the x and y of the image as the second and third respectively, and the width and height as the fourth and fifth!
Just under where we commented out the circle code write the following:
image(cookieImage, 300, 300, diameter, diameter)
Now when you run you should see the following:

Which isn’t quite right, images are drawn from the top left as the reference point we want the reference point to be the center, so similar to what we did with the text let’s add imageMode(CENTER) just before our image. All of the code together should look like the following:
var score = 0
var diameter = 300
var cookieImage
function setup() {
  createCanvas(600, 600)
  cookieImage = loadImage('cookie.png')
}

function draw() {
  background(251, 211, 219)
  //circle(300, 300, diameter)
  imageMode(CENTER)
  image(cookieImage, 300, 300, diameter, diameter)
  text(score, 300, 100)
  textAlign(CENTER)
  textSize(60)
  diameter = lerp(diameter, 300, 0.1)
}

function mouseClicked() {
  var distance = dist(300, 300, mouseX, mouseY)
  if (distance <= 150) {
    score++;
    diameter = 280
  }
}
Which should play like:

Ideas
And that’s it for the blog but you shouldn’t stop there! If you really want to learn how to program you need to try stuff yourself here’s some ideas you can code extending our cookie clicker game to hopefully emphasise what we’ve learnt.
- The closer you click to the centre the larger the increase in the score
- Make the cookie grow as the score increases
- Make the cookie move around the screen
- Make the cookie spin
Use your imagination, or have a look at some features other cookie clickers have and try to replicate what they’ve done. I suggest using the p5.js reference to see what functions you can use!
What next
And there you have it, you’ve coded a game and learned some of the key concepts in programming. If you enjoyed this blog then I recommend moving on to The Top 5 BEST games to code as a beginner, if you follow along with those blogs you should be in a good position to be able to create your own games, or maybe even create multiplayer games so that you can play with your friends!
Pingback: How To Code Snake ðŸ - The simplest way to learn game dev concepts