Nokia’s snake was launched in 1997 with the Nokia 6110, the catalyst for mobile gaming! The concept of the game snake, however, existed long before the 1997 version. In another blog I talk about How to code Blockade (1976) which is essentially player vs player snake a good 21 years before!
In this blog I’m going to go through the step-by-step process of coding the game Snake, as it is commonly prescribed to beginner programmers as the game to code. However, I wouldn’t personally recommend this game to beginner programmers as Snake certainly has some tough quirks you have to figure out. If you are a new programmer I’d recommend taking a look at Top 5 BEST games to code as a beginner! or, if you’ve never coded before at all then take a look at How To Code A Game As A Beginner.
Let’s get started coding snake!
So for this blog I’m going to be using https://editor.p5js.org/ which uses the p5.js library which makes using the Canvas a more pleasant experience. All the code that I’m writing for this blog [can be found here](https://editor.p5js.org/codeheir/sketches/yJPfyIuPy) so feel free to use that as a reference if you get stuck.
Making a grid for the snake to live
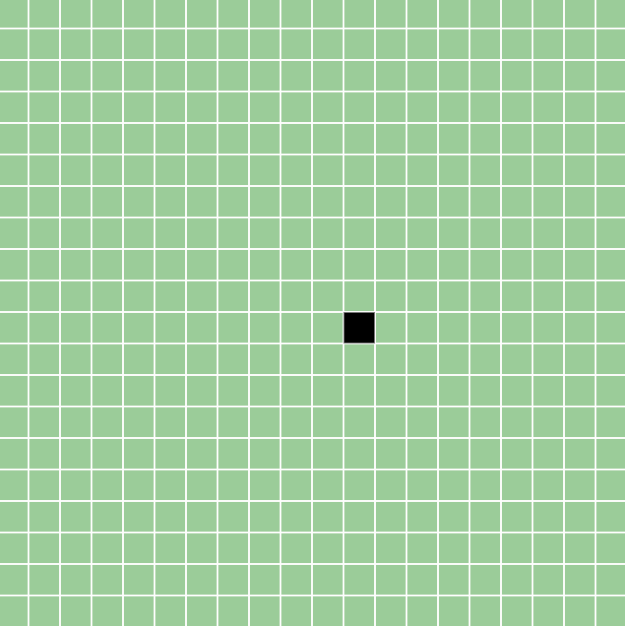
If you study the game of snake you can kind of see that everything is placed within a hidden grid, let’s create our own grid – which will be removed at the end – so we can keep everything in place and make our lives easier.
const GRID_SIZE = 20;

function setup() {
   createCanvas(700, 700);
}

function draw() {
  background(155, 204, 153);

  for (let x = 0; x < width; x += width / GRID_SIZE) {
    for (let y = 0; y < height; y += height / GRID_SIZE) {
      	stroke(255);
        strokeWeight(1);
        line(x, 0, x, height);
        line(0, y, width, y);
    }
  }
}
Which should give you something like this:

Now we can tinker with GRID_SIZE to fit our game to our liking at any stage. This is an important variable, the snake’s position and the food’s position will be based on this.
Creating the Snake
Let’s create a new file called snake.js which’ll contain a class for our snake. Don’t forget to add the reference to your index.html so we can use it:
  <body>
    <script src="sketch.js"></script>
    <script src="snake.js"></script> // add this
  </body>
Snake.js
class Snake {
  constructor() {
    this.body = [];
    this.body.push({x: width/2, y: height/2}); // the head of the snake
    this.dir = 1; // 1 = right, 2 = down, 3 = left, 4 = right
  }

  draw() {
    fill(0);
    for (let b of this.body) {
      rect(b.x, b.y, width / GRID_SIZE, height / GRID_SIZE)
    }
  }

  update() {
    if (this.dir == 1) {
      this.body[0].x += width / GRID_SIZE;
    } else if (this.dir == 2) {
      this.body[0].y += height / GRID_SIZE;
    } else if (this.dir == 3) {
      this.body[0].x -= width / GRID_SIZE;
    } else if (this.dir == 4) {
      this.body[0].y -= height / GRID_SIZE;
    }
  }
}
So we’ve created a body for our snake which is an array that’ll contain the x and y locations of the part of the body – we’re adding the head of the snake to the body in the constructor, so when we new up the Snake object.
I’m pre-empting the movement of the snake, I know it’s going to be able to move either up down left or right, so if the dir value is set to 1 then we’re going right, if it’s set to 2 then we’re going down, 3 then we’re going left and 4 is up.
We’ve also got a draw method which simply draws the rectangles representing the body of the snake.
And finally, the update method which just moves the head of the snake in the direction we’re moving. Note, I only move the head of the snake because if I were to move the whole snake in a given direction then it wouldn’t look like a snake at all. We’re going to need to come back to this method as we will need to update the rest of the body – when we have the rest of the body and not just the head.
sketch.js
Back in sketch.js we need to create the snake object and call our update/draw methods. Also we’ll limit the framerate to 4 to give us that retro feel!
const GRID_SIZE = 20;

let snake;
function setup() {
  createCanvas(700, 700);
  snake = new Snake();
  frameRate(4);
}

function draw() {
  background(155, 204, 153);
  for (let x = 0; x < width; x += width / GRID_SIZE) {
    for (let y = 0; y < height; y += height / GRID_SIZE) {
      	stroke(255);
        strokeWeight(1);
        line(x, 0, x, height);
        line(0, y, width, y);
    }
  }

  snake.update();
  snake.draw();
}
Then when you hit play you should have something like this:
Adding key pressed handlers
When we hit the arrow keys we want to change direction, add this function to your sketch.js
function keyPressed() {
  if (keyCode === 39 && snake.dir !== 3) {
    snake.dir = 1;
  } else if (keyCode === 40 && snake.dir !== 4) {
    snake.dir = 2;
  } else if (keyCode === 37 && snake.dir !== 1) {
    snake.dir = 3;
  } else if (keyCode === 38 && snake.dir !== 2) {
    snake.dir = 4;
  }
}
So this is saying, when we press right and we’re not going left change direction to right, when we press down and we’re not going up, go down, etc.
Have a little play:

Adding food for the snake
When the snake eats food, it grows, let’s feed it.
food.js
Create a new file food.js and remember to add the reference to this in your index.html.
class Food {
  constructor() {
    this.spawn();
  }

  spawn() {
    let randX = random(width);
    let randY = random(height);
    this.x = randX - randX % (width / GRID_SIZE);
    this.y = randY - randY % (height / GRID_SIZE)
  }

  draw() {
    fill(255, 100, 100);
    rect(this.x, this.y, width / GRID_SIZE, height / GRID_SIZE);
  }
}
So we’re giving the food a random location in the grid, the code randX - randX % (width / GRID_SIZE); is just allowing us to align the food within a grid square.

We’ve added the food but not given our snake the means to eat it ? Let’s give him a mouth.
In our main draw function in sketch.js
...
function draw() {
  background(155, 204, 153);
  for (let x = 0; x < width; x += width / GRID_SIZE) {
    for (let y = 0; y < height; y += height / GRID_SIZE) {
      	stroke(255);
        strokeWeight(1);
        line(x, 0, x, height);
        line(0, y, width, y);
    }
  }

  snake.update();

  if (snake.hasEatenFood()) {   // add this code
    food.spawn();
  }

  snake.draw();
  food.draw();

}
We’ve not yet written the hasEatenFood method so let’s add that in snake.js
...
hasEatenFood() {
    if (this.body[0].x == food.x && this.body[0].y == food.y) {
      return true;
    }
  }
Awesome! Now our snake can eat and not get bigger, jealous? Let’s add some code to make our snake grow.
Snake.js
So there’s a few things here we need to add, here’s the whole finished file, I’ll explain what’s added below:
class Snake {
  constructor() {
    this.body = [];
    this.body.push({x: width/2, y: height/2}); // the head of the snake
    this.dir = 1; // 1 = right, 2 = down, 3 = left, 4 = right

    this.lastX = width/2;
    this.lastY = height/2;
  }

  draw() {
    fill(0);
    for (let b of this.body) {
      rect(b.x, b.y, width / GRID_SIZE, height / GRID_SIZE)
    }
  }

  update() {
    this.lastX = this.body[this.body.length-1].x;     // track the last X and Y
    this.lastY = this.body[this.body.length-1].y;     // so we can put the new body there
    for (let i = this.body.length-1; i >= 1; i--) {
      this.body[i].x = this.body[i-1].x;
      this.body[i].y = this.body[i-1].y;
    }

    if (this.dir == 1) {
      this.body[0].x += width / GRID_SIZE;
    } else if (this.dir == 2) {
      this.body[0].y += height / GRID_SIZE;
    } else if (this.dir == 3) {
      this.body[0].x -= width / GRID_SIZE;
    } else if (this.dir == 4) {
      this.body[0].y -= height / GRID_SIZE;
    }
  }

  grow() {
    this.body.push({x: this.lastX, y: this.lastY});
  }

  hasEatenFood() {
    if (this.body[0].x == food.x && this.body[0].y == food.y) {
      return true;
    }
  }

}
We now track the lastX and the lastY of the snake so that when the snake eats that position is basically where the food goes, it effectively goes straight to its butt. I’ve also added code to update the whole body of the snake, so in the update method you’ll see the code:
    for (let i = this.body.length-1; i >= 1; i--) {
      this.body[i].x = this.body[i-1].x;
      this.body[i].y = this.body[i-1].y;
    }
This is updating each body to be the x and y of the element before it, remember the head is at index 0.
And we’ve also added the grow() method which simply appends to the array with the new body.

Adding hit detection
We want to make sure that the snake doesn’t bump into itself, and if it does then we need to restart the game.
I’ve added a new method hitDetection() that gets called in the update() of the snake class:
  hitDetection() {
    for (let i = 1; i < this.body.length; i++) {
      if (this.body[0].x == this.body[i].x && this.body[0].y == this.body[i].y) {
        this.spawn();
      }
    }
  }
So this simply checks to see if the head of the snake hits any other part of its body. I’ve also moved the constructor code into a spawn() method the same as the food class, here’s all the code:
class Snake {
  constructor() {
    this.spawn();
  }

  // added this
  spawn() {
    this.body = [];
    this.body.push({x: width/2, y: height/2});
    this.dir = 1;
    this.lastX = width/2;
    this.lastY = height/2;
  }

  draw() {
    fill(0);
    for (let b of this.body) {
      rect(b.x, b.y, width / GRID_SIZE, height / GRID_SIZE)
    }
  }

  update() {
    this.hitDetection();

    this.lastX = this.body[this.body.length-1].x;
    this.lastY = this.body[this.body.length-1].y;
    for (let i = this.body.length-1; i >= 1; i--) {
      this.body[i].x = this.body[i-1].x;
      this.body[i].y = this.body[i-1].y;
    }

    if (this.dir == 1) {
      this.body[0].x += width / GRID_SIZE;
    } else if (this.dir == 2) {
      this.body[0].y += height / GRID_SIZE;
    } else if (this.dir == 3) {
      this.body[0].x -= width / GRID_SIZE;
    } else if (this.dir == 4) {
      this.body[0].y -= height / GRID_SIZE;
    }
  }

  // added this
  hitDetection() {
    for (let i = 1; i < this.body.length; i++) {
      if (this.body[0].x == this.body[i].x && this.body[0].y == this.body[i].y) {
        this.spawn();
      }
    }
  }

  grow() {
    this.body.push({x: this.lastX, y: this.lastY});
  }

  hasEatenFood() {
    if (this.body[0].x == food.x && this.body[0].y == food.y) {
      return true;
    }
  }

}
Losing the grid
Next let’s remove the code we added for our grid, it was simply there to make sure everything was kept in line!
So your draw function in sketch.js should look like this:
function draw() {
  background(155, 204, 153);
  /**
  let x = 0; x < width; x += width / GRID_SIZE) {
  for (let y = 0; y < height; y += height / GRID_SIZE) {
      stroke(255);
      strokeWeight(1);
      line(x, 0, x, height);
      line(0, y, width, y);
    }
  }
  */
  snake.update();

  if (snake.hasEatenFood()) {
    food.spawn();
    snake.grow();
  }
  stroke(155, 204, 153); // add this
  snake.draw();
  food.draw();

}

What’s next?
The most complicated parts of Snake are done, but there’s still some things we need to tweak. The best way to learn is by doing, so I challenge you to continue on with the coding and see if you can complete the following tasks. Please let me know if you manage any/all of them, I’d really appreciate that!
- When the snake hits the edge of the map the game should restart or the snake should come out the other side of the wall
- Add a scoring system and display the number (Could just be the snakes
bodylength) - Make sure the food doesn’t spawn on the Snakes body.
- Start the snake off already with a body size of 5
I hope you’ve enjoyed this blog, have fun with it, coding games can be really rewarding!


Pingback: GitHub contributions Snake extension - Codeheir